Building
Art and C++ files can be built into applications or libraries. The build process consists of three steps:
-
Generate source files In this step Art files are translated to C++ source files.
-
Generate a make file A make file for building generated C++ code (and possibly also other non-generated C++ source files) is generated.
-
Run make to generate binaries A make tool is invoked for building an executable or library from the generated make file.
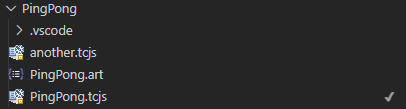
All these steps require information which is stored in a transformation configuration (TC for short). It is a text file which contains various properties needed for translating Art elements to C++ code, for generating the make file, and finally for launching the make tool. You can have more than one TC in your workspace, but at most one TC in each workspace folder can be active. Set a TC as active by right-clicking on it and perform the command Set as Active. An active TC is marked with a checkmark.
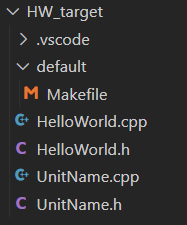
Once there is an active TC in a workspace folder, the first and second steps (generation of C++ source files and make file) will happen automatically for all Art files contained in that workspace folder. The files that get generated are placed in its own workspace folder as specified by the targetFolder property of the TC. The C++ code in this target workspace folder is then incrementally and automatically updated as soon as any of these Art files are changed. Also the make file (which by default is placed in a subfolder called default in the target workspace folder) gets updated when needed. Below is an example of a simple target workspace folder.
To perform the third step (running make to generate binaries) you can simply go to the target folder in the Terminal and invoke the command make. Alternatively you can use the TC context menu command Build (see below).
TC Context Menu Commands
The context menu of a TC provides a few useful commands that automate some of the steps mentioned above:
-
Build This command first generates C++ code and a make file for the TC, and then runs the make tool on the generated make file. Note, however, that this command does not set the TC as active. If you plan to change code snippets in generated code you must set the TC as active yourself.
-
Run First builds the TC, and then attempts to launch the executable that is produced. The executable is launched in a non-debug mode by specifying the launch argument
-URTS_DEBUG=quit. If you want to launch the executable in a different way, for example with different command-line arguments, you can go to the Terminal and manually launch it from there. Note that if your TC creates a library rather than an executable, then this command will still build the TC, but will then give an error message since there is no executable to run.
Note
For a more flexible way of launching a built executable, either for running or debugging it, use a launch configuration.
- Clean
Removes the target workspace folder produced when building a TC. If the TC has prerequisites they will be cleaned too. This means that all generated C++ code, the make file, as well as any produced binaries will be removed. If you only want to remove the binaries you can instead go to the Terminal and invoke
make cleanto clean using the make file.
If you build a TC and at least one error exists in the TC itself, in prerequisites TCs or in any of the Art files that will be built, then a dialog will ask if you want to cancel the build (recommended) or proceed anyway (only do this if you are confident the errors are safe to ignore).
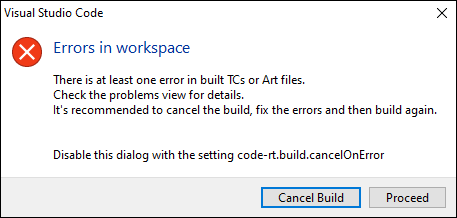
Use the setting code-rt.build.cancelOnError to suppress this dialog.
Cancelling an Ongoing Build
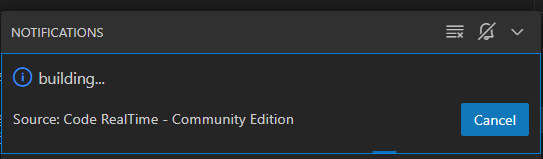
While a build is in progress you will see a "progress spinner" in the status bar.

You can cancel the ongoing build by clicking on this progress spinner, and then click the Cancel button in the popup that appears:
The build will be terminated immediately with a printout in the Art Build output channel: "Build terminated by user." You should expect that the target folder in this case will contain a partial build result. For example, some but not all object files may be present if the build was cancelled while compiling generated code.
Building and Running without a TC
In some cases of rapid prototyping and testing you may want to quickly build and run a capsule without first having to create a TC or a launch configuration. Then you can click the "Run" link that appears just before any capsule in the Art text editor.
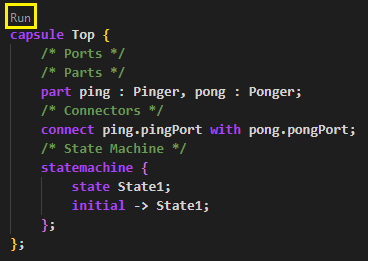
This command will create a temporary TC file and use a temporary target folder. All other TC properties will have their default values.
You can also use this "Run" link for a top capsule when a TC is present. The same thing then happens as if you would build and run that TC.
Build Messages
When you use the Build or Run commands on a TC, messages will be printed in two places depending on what kind of message it is:
- The Terminal view. Messages produced when compiling and linking the generated C++ code will be printed here, for example compilation errors. In many cases such messages will have a reference to a generated C++ file which you can Ctrl-click to open. In case of Run, messages printed by the running executable will also be printed in the Terminal view. To terminate a running executable you can press Ctrl+C in the Terminal view.
- The Art Build output channel. All other build messages are printed here, for example messages emitted by the C++ code generator. In some cases these messages will have a reference to a file (e.g. an input TC or Art file), and sometimes even to an element within that file. You can Ctrl-click these to open the file and navigate to the element. In case the build fails (e.g. because of compilation errors) a hyperlink will be present for opening the Terminal view where the errors that caused the build to fail can be found.

Navigation Between Art and Generated C++
You can navigate from an element in an Art file to the corresponding element in the C++ file that gets generated from that Art file. Use the context menu that appears when you right-click on an element in an Art file and invoke the command Open Generated Code. If C++ code has not yet been generated for the Art file, for example because no active TC has been set, navigation will fail with an error message.
When navigating to generated C++ code an attempt is made to put the cursor as close as possible to the relevant C++ element. However, when there is no C++ element that directly corresponds to the selected Art element, the cursor may instead be placed on a container C++ element. If there are more than one C++ element generated from a single Art element, you will be prompted for where to navigate. For example:

For C++ code snippets you can as an alternative perform the navigation using a tooltip that appears when you hover over the code snippet:
If the cursor is within the C++ code snippet when navigating, the cursor will be set at the same place in the generated C++ code. This is convenient if you start to edit a code snippet in an Art file but later realize that you want to edit it in the generated C++ code instead.
You can also navigate in the other direction, i.e. from generated C++ code to the source Art file. This is described below in Making Changes in Generated C++.
Making Changes in Generated C++
C++ code snippets that are embedded in the Art file will be enclosed by special comments in the generated C++ file. You can edit such code snippets in a generated C++ file. When you save the file your changes will be automatically propagated back to the Art file. Here is an example of what a code snippet may look like in the generated C++ code:
//{{{USR file:///c:/code-realtime/workspaces/demoWorkspace/HelloWorld.art#::HelloWorld::<TopStateMachine>::<TriggeredTransition_5>::<Effect>
    std::cout << "Hello World!" << std::endl;
    context()->abort();
//}}}USR
The comment contains information about the source Art file and the Art element in the file that contains the code snippet.
Warning
Only make edits on the lines within the special code snippet comments. If you edit outside the comment those edits will be lost the next time the file gets regenerated. And if you change the comment itself, the propagation of changes back to the Art file will no longer work correctly.
One very common scenario where it's useful to change a code snippet in a generated file is when there is a compilation error reported in the code snippet. Navigating from that compilation error will take you to the code snippet in the generated file, and it's convenient to directly fix the problem there.
Another scenario is when you write new code in such a code snippet and want to take advantage of the editing support for C++ that is provided by your IDE, and/or need to see the full C++ context of the edited code snippet. You can navigate from the code snippet in the Art file to the code snippet in the generated file as described above.
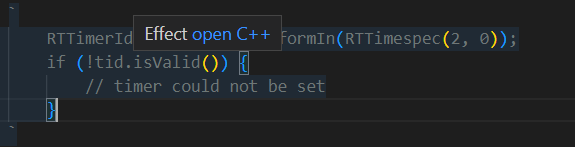
Sometimes you may need to navigate in the other direction, i.e. from a code snippet in the generated C++ code to the source Art file. For example, when editing the effect code of a transition it can be useful to look at that transition in its state machine (either in the Art file or in a state diagram). You can Ctrl-click the hyperlink of the USR-comment to perform this navigation as shown in the picture below.

You can make edits in multiple code snippets in a generated file. When the file is saved all edited code snippets will be automatically propagated back to the Art file.
Warning
Automatic synchronization of edited code snippets requires that the C++ file is edited and saved in Code RealTime. If you edit generated C++ files in another editor, you need to invoke a synchronization command for the changes to propagate back to the Art files.
Pay attention to the status bar in the bottom left corner when you save a generated file. If you know at least one code snippet was modified, but still get the message shown below:

then you can know the changes failed to propagate to the Art file. If the update was successful you should instead get a message that tells how many code snippets that were updated. For example:

Synchronizing External Edits
Sometimes you may want to edit generated C++ files in another editor, external to Code RealTime. For example, if you debug your application in another C++ IDE it can be convenient to directly make changes there. For those changes to propagate back to the source Art files, and not be lost the next time you build your application in Code RealTime, you must manually invoke a synchronization command. There are two such commands available:
- Synchronize Code Snippets This command synchronizes all C++ files generated from one specific TC. Invoke the command either from the TC context menu (in the Explorer view or TC text editor), or from the Art Build view.
- Synchronize All Code Snippets This command is available in the toolbar of the Art Build view. It scans the whole workspace for target workspace folders that have been produced by building TCs, and synchronizes all C++ files in those workspace folders.

Both these commands report in the Art Server console how many code snippets that were updated.
Building from the Command Line
You can build a TC from the command line by using the Art Compiler.